Putting an old iMac to use

So, I have this old iMac "Early 2009" Aluminum iMac Core 2 Duo. I decided to make something usefull out of it, so I upgraded the RAM to 8GB, replaced the original HDD with 1TB SSD and installed Ubuntu 20.24.
Important note: Bellow, I describe how I configured autologin and how I changed permissions to /sys/. These are NOT are not good security practices. However, given that the machine is sitting on my desk, and behind a well configured firewall, my assesment was that it is safe for me to do them. Please do your own security assesment.
Installing Ubuntu
Intalling Ubuntu was straight forward with two exceptions:
- The nouveau video driver seems to freeze when X does something intensive (and by intencive I mean opening Firefox). But I did not care about it as I intended to use this on console mode.
- The wifi driver is a commercial one, and you have to have newtork connectivity to install it. So, I had to use Ethernet, use
ubuntu-driversto identify the driver I needed and install it. From that point on, I could configure wifi and Ethernet was no longer needed.
Booting in console mode.
First stem, was to disable X from starting on boot.
systemctl enable multi-user.target
systemctl set-default multi-user.target
/etc/default/grub
# If you change this file, run 'update-grub' afterwards to update
# /boot/grub/grub.cfg.
# For full documentation of the options in this file, see:
#   info -f grub -n 'Simple configuration'

GRUB_DEFAULT="Ubuntu"
GRUB_TIMEOUT="3"
GRUB_DISTRIBUTOR="`lsb_release -i -s 2> /dev/null || echo Debian`"
GRUB_CMDLINE_LINUX_DEFAULT="text"
GRUB_CMDLINE_LINUX=""

# Uncomment to disable graphical terminal (grub-pc only)
GRUB_TERMINAL="console"

GRUB_GFXMODE="640x480"
# Uncomment to disable generation of recovery mode menu entries
GRUB_DISABLE_RECOVERY="false"

# Uncomment to get a beep at grub start
GRUB_INIT_TUNE="480 440 1"

GRUB_DISABLE_OS_PROBER="true"
GRUB_SAVEDEFAULT="false"
Configuring tty1
This would be a keyboardless system, so I would like to make sure that tty1 starts with some things on it.
$ sudo systemctl edit getty@tty1.service
This (creates and) openes file /etc/systemd/system/getty@tty1.service.d/override.conf for editing. I entered:
[Service]
ExecStart=
ExecStart=-/sbin/agetty --noissue --autologin vrypan %I $TERM
Type=idle
To enable the service and starts an auto-login session on tty1:
$ sudo systemctl enable getty@tty1.service; sudo systemctl restart getty@tty1.service
To automatically run some useful stuff on tty1, I added the following lines to $HOME/.profile:
if [[ "x$XDG_VTNR" = "x1" && "x$SHLVL" = "x1" ]] ; then
    # Sometimes fbterm failed to start immediately, it seems that
    # the framebuffer needs a couple of milliseconds to initialise.
    # Or maybe it's something else, but waiting a second or
    # two fixed it.
    echo Waiting 2 secs...
    sleep 2
    /usr/bin/fbterm -- tmuxp load -y $HOME/custom/tmuxp.tty1.yaml
fi
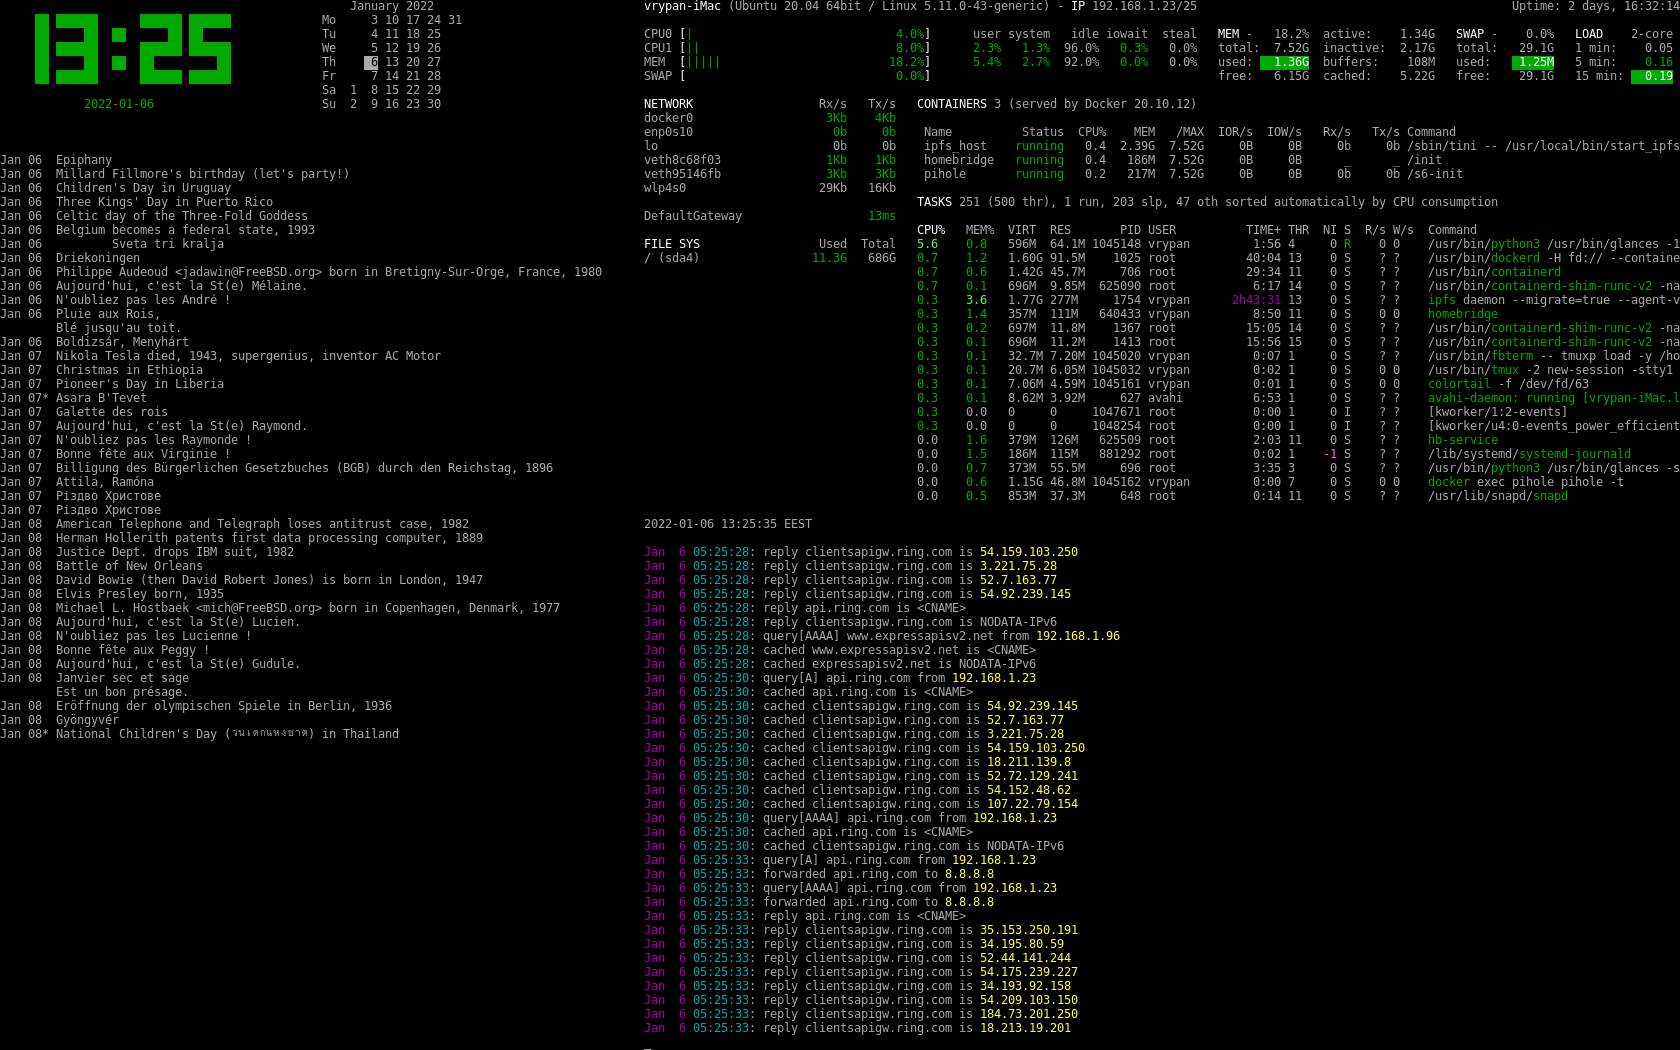
tmuxp.tty1.yaml will start a tmux session with all the panes arranged like I want them and run the corresponding processes in each one of them.
#  tmuxp.tty1.yaml
session_name: tty1
windows:
  - window_name: status
    focus: 'true'
    layout: 0774,240x75,0,0{91x75,0,0[91x10,0,0{45x10,0,0,1,45x10,46,0,7},91x64,0,11,2],148x75,92,0[148x38,92,0,3,148x36,92,39,4]}
    options:
      automatic-rename: 'off'
      pane-active-border-style: fg=black
      pane-border-style: fg=black
      status: "off"
    panes:
    - tty-clock
    - while true; do clear; ncal -M ; sleep 1m ; done
    - while true; do clear; calendar -A 2 ; sleep 1m ; done
    - glances -1
    - colortail -f <(docker exec pihole pihole -t )
    start_directory: /home/vrypan

  - window_name: lights_on
    panes:
      - shell_command:
          - tput setab 7
          - clear
And this is the result:
The services
I also installed docker, and then configured a couple of containers (that replaced rasperrypis I used for this purposes):
- pihole
- an ipfs server
- and homebridge
I also configured syslog-ng to receive logs from my Unifi Dream Machine:
# /etc/syslog-ng/conf.d/remote.conf
source t_src { tcp(port(514)); };
source u_src { udp(port(514)); };
destination r_all { file("/var/log/$HOST"); };
log { source(t_src); source(u_src); destination(r_all); };
Using the iMac as a (sort of) LED panel light
You may have noticed there is a second tmux window, called ligths_on. I find this kind of cool. It's a window that is all white (tput settab 7 sets the background to white). So I can ssh to this machine, do tmux next -t tty1 and the screen will turn on white.
And since this is placed on my desk, I use it as a light panel (!!!) that makes me look better when I'm on a video call on my laptop. Then tmux next -t tty1 will switch back to my normal "control center" view.
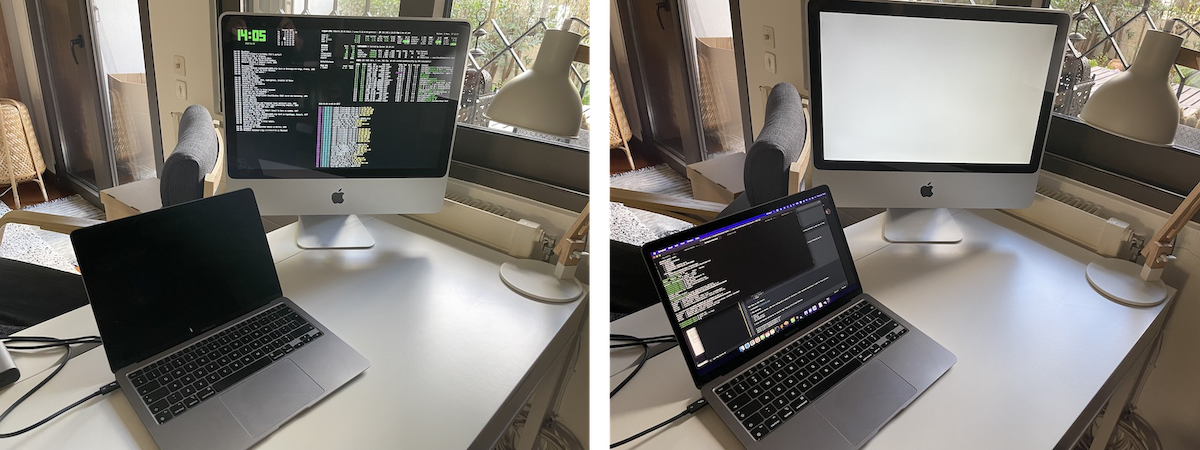
Of course, don't expect a thousand nits from this display. But it makes a difference when there's low light.
Turning on and off the iMac screen using Siri
I don't want my iMac screen to be on all the time. So I use the following over ssh
$ echo 0 |sudo tee /sys/class/backlight/nv_backlight/brightness # turn off
$ echo 100 |sudo tee /sys/class/backlight/nv_backlight/brightness # turn on
But since I have already homebridge running, why not use Siri for this?
I order to easily allow the homebridge docker container to access /sys/class/backlight/nv_backlight/brightness I changed the permissions
$ sudo chmod 666 /sys/class/backlight/nv_backlight/brightness
and I also mount /sys/class/backlight/nv_backlight/ as a rw docker volume, so my docker-compose file looks like this:
version: '2'
services:
  homebridge:
    image: oznu/homebridge:latest
    container_name: homebridge
    restart: always
    network_mode: host
    environment:
      - TZ=Europe/Athens
      - PGID=1000
      - PUID=1000
      - HOMEBRIDGE_CONFIG_UI=1
      - HOMEBRIDGE_CONFIG_UI_PORT=8581
    volumes:
      - $HOME/data/homebridge:/homebridge
      - /sys/class/backlight/nv_backlight:/backlight:rw
Next I installed the homebridge-shell-switch plugin, and configured like this:
{
    "accessory": "ShellSwitch",
    "name": "Monitor",
    "onCmd": "echo 100 > /backlight/brightness",
    "offCmd": "echo 0 > /backlight/brightness"
}
Now, I can turn on and off the monitor by saying Hey Siri, turn the monitor off. I can also schedule the monitor to turn off during the night for example, or turn it on/off using the Home.app on my iPhone.